Hello.
This is my first post on my SharePoint Blog.
I want to start with some basic SharePoint development technics that every SharePoint developer should be familiar with.
It’s all about lists, the famous SharePoint lists! So as a first step in the development world, we should be familiar with SharePoint development tools and templates included in Visual studio, and especially this time the List Instance, List Definition, Content Types and finally list definitions from content types.
A SharePoint list is a set of columns or fields. Adding a new item in the list means defining a value for each field or for only some fields in that item.
Sometimes we need to make things more organized and structured so we can manage too much data of different types in the same list or in different lists and keep it all working together and the most important thing to keep in mind, to get something “easy to understand” and “easy to manipulate”.
That’s why, as a best approach, I prefer to use content types with lists.
Technically speaking, we start by (1) defining our content type and the different fields that we need to include in this content type, then (2) we create a list definition that gets it’s columns from this content type, and finally, to get our list, (3) we create a list instance from our list definition.
Using this approach we can get our site scoped content type that we can use anywhere in the site collection and a list definition so we can at any time create another list instance with the same columns.
So to start:
– Launch visual studio and create an empty SharePoint Project, define the site that you want to use for debugging
– We will start by defining the fields that we will need to use in our content type, so we need to add a new item to the project and select “Empty Element”.
Fields should be site collection scoped elements so we can use them anywhere in the site collection and in any other sub site.
Double click on the added empty element to access it’s elements.xml file where we will define our fields.
Here we add four simple fields to get some customer details.
I also define the static name attribute that I want from the beginning so I know with which static name I will get this field from this list programmatically if we need to do so.
Notice that the “Country” field is not shown in the edit form, we suppose that we don’t want to allow the user to change the customer’s country once it’s added to the list, so we don’t show it in edit mode.
– (1) Add a new item to the project, select the “Content Type” Template, we will call it “Customers”, the wizard will ask you then to choose the base content type to inherit from. Different out of the box base content types are defined so we can choose the base content type depending on what we want to create. This time and for demonstration purposes we will select the “Item” base content type.
We will call it “Customers” to get our Customers Content Type.
Here we need to get a reference for the fields that we have just defined, using the same ID attribute.
We can also change the name since we want to call it “Customers”.
As we can see, the generated content type ID starts with “0x01” (The ID of the base or Parent content type which is “Item” as described in the commented line) followed by “00” and then the last part is the new hexadecimal GUID.
Content type IDs are explained in the following msdn link http://msdn.microsoft.com/en-us/library/aa543822(v=office.14).aspx
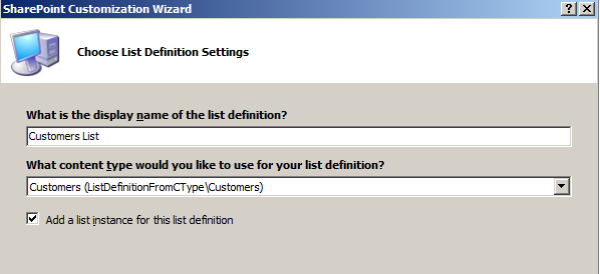
– (2) Add a new item to the project and select “List Definition from content type”, we will call it “Customers List”.
– (3) The SharePoint Customization Wizard will ask you on the next step to define the list definition settings and if you want to add a list instance for this list definition or not. On the dropdown list we will get all the existing content types created in our visual studio solution so we need to select the right one. Any way this time we will get only one content type, our Customers Content type.
– We keep the last option checked to get our list instance on the site once the solution is deployed.
We click “Finish” to close the wizard and to get a list definition and a list instance added to our project.
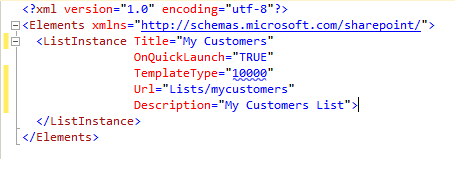
Double click the list instance item to open and edit/add, if we need it’s definition attributes.
I changed the Title and the Url to get something more meaningful and easy to remember or to type as the url.
Double click the elements.xml file to open and edit the settings of the list template.
Read the comment below the elements tag to remember or to get sure that you will not change the value of the name attribute :p, otherwise you will get an error if it does not match the folder name of the list definition project item which is “Customers List” in our sample.
I added the “DisallowContentTypes” attribute and defined it’s value to false so content types can’t be managed on lists created throw this list definition, otherwise we can make “TRUE” if we don’t want to do so.
Finally open the “Schema.xml” file to edit it’s content and finish all this work.
Some attributes are easy to understand such as:
- Title : the display name of the list
- FolderCreation : to allow the creation of folders in this list or not (new folder command will be displayed in the new menu or not)
- EnableContentTypes : I added this attribute and defined it’s value to TRUE because we need to use the customers content type
- Name : is the internal name of the list
- Url : the site relative url of the list
ContentTypes tag contains the content types that will be used in our list. It’s the same content type definition that we have created.
The next tag “Fields” contains the fields that we have created at the beginning in the empty element.
“Views” then defines the views in this list, here we need to add or to reference the fields that we want them to appear in the default view (the second one with the attribute “DefaultView=”TRUE”), so add the fields references in the “ViewFields” tag.
I deleted the “LinkTitle” field reference because I don’t want that field to appear in my default view.
The “Query” part means that items in this view will be displayed and ordered by the ID column.
The last part “Forms” define the different forms that will be generated and used with this list. (Display Form, Edit Form and New Form”).
That’s it !!! so I just want to finish with one last detail.
I don’t know if you have noticed in the previous photo the two windows already opened in my visual studio “List Definition and Instance.feature” and “Fields and Content Type.feature”, if you really did and now you are wondering what they are doing and why I kept them in my screen, it’s OK I will tell you.
Visual Studio or custom content created with visual studio is deployed to SharePoint site through features. When we added our first empty element to define the fields VS have automatically added a feature to deploy this item to SharePoint. So to do things as they should be done, and because I love to do so and as a good practice, I added a second feature to my project, I renamed the two features to give them more meaningful names.
The first one (F1),is called “Fields and Content Type.feature” and it contains the empty element used to create the fields and the content type that reference them. It should be a site scoped feature so we can use these fields and this content type anywhere as I said in our site collection.
The second one (F2) is called “List Definition and Instance.feature” and it contains as its name indicates the list definition from our customers content type and the list instance that we will find once we deploy the solution. This one should be a web scoped feature because we need to use this list and to find it’s template in our site.
We can also change the title and the description of the feature so we can remember or understand what it should do every time we will activate or deactivate it.
(F1)
(F2)
That’s it! Now I just need to deploy my project to get it all in my site.
Check your quick launch menu and there’s our famous “My Customers” list.
As we can see the fields that we defined in the “ViewFields” section in the schema.xml file appears in the default view.
The title field does not appear in the default view but it appears in the list forms (new, edit and display form). We don’t often need it with that name so I will make another post the next time to see what we can do with that field.
Just to show you all what we got installed on our SharePoint site.
Our site collection scoped feature “Customers Content Type and Fields”. Click “Site Actions”, “Site Collection features” under “Site Collection Administration” to access the list of site scoped features.
Our web scoped feature “Customers List Definition and List Instance”. Click “Site Actions”, “Manage Site Features” under “Site Action” to find it.
Click “Site Actions”, “Site Settings” and “Site Columns” under “Galleries” to view the fields that we created within the empty element at the beginning.
Click “Site Content Types” under “Site Columns” to see the “Customers” custom content type under “Custom Content Types” group.
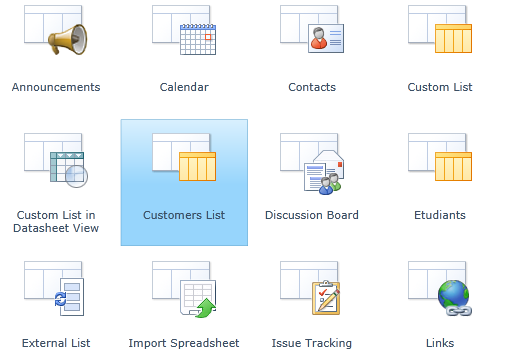
And finally, click “Site Actions” menu, “More Options” and “List” menu to access the list templates installed on the site, and here we find our “Customers List” template. Now we can easily create another list with a different name but with the same columns.
Every time a list is instantiated from this list template, it will be using the “Customers” content type.
I stop here! I hope that was helpful and easy to understand. It’s not just about list definitions and content types, this time you learned, from only one tutorial, how to deploy custom fields to the site with an empty element, how to create a custom content type and then a list definition that gets it’s columns from it, how to create a list instance and define the fields that will appear in the view and one more thing, the most important thing, how to use features to deploy custom development work to SharePoint and how features are scoped and even how to do to get things more organized, structured and easy to manipulate even for the end user. If you really understand all that and you feel exited to see something more interesting, in my opinion you should stop reading, you take a coffee or something like that and imagine how we can use these simple steps to get into something more complicated as a real world project.
Me, I will take a coffee too but this time I don’t want to do so, just a coffee lol.


