Provisioning an Office 365 Developper Site and First Steps With SharePoint 2013

Hello,

I don’t think that i’m the only one who has enough reasons to write all this post and to talk about all these steps and tools. We have all heard about SharePoint 2013. As a SharePoint Developer I was wondering how to start, or how to get a development and testing environment, so if you are looking for the same thing and you couldn’t get or download a virtual machine with SharePoint 2013 installed or if your hardware does not meet the minimum requirements necessary to run it or even if you don’t have all the required licenses… whatever was the reason, don’t give up because there’s always a solution.

All what you have to do is (1)  to sign up for an Office 365 Developer Site and you will get a SharePoint Site already preconfigured for what we call “apps”. (the new way of packaging SharePoint 2013 Solutions).

Once we have our developer site provisioned, the next step is to (2) install and deploy what we call Napa” Office 365 Development Tools. Using this browser-based authoring tool, we will be able to start building SharePoint-hosted apps without having to install anything on our machine.

Assuming that you still want to leverage the full power of the Microsoft Office Developer Tools for Visual Studio 2012 or to take advantage of the other web development features, we will see how to (3) download and import the project that we have started with Napa into Visual Studio 2012. (i will show you what to install exactly on your machine to get the Microsoft Office Developper Tools integrated into your VS)

So to sign up for an Office 365 Developer Site, you can either start with a free 30-day trial or to buy an Office 365 Developer Subscription.

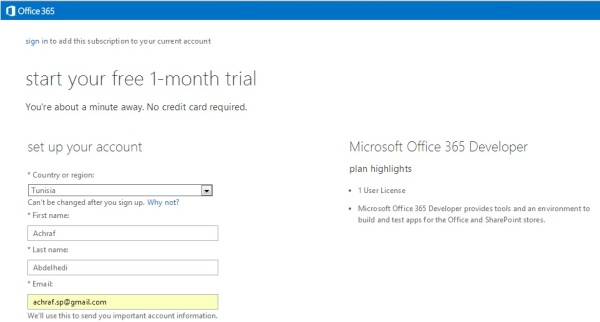
I have chosen the first option so once the page is loaded we will get the next screen. (The page detects the default language of your browser and in my case i have selected the English option)

1

Here we need to fill the fields with the required information to setup the account and to get our user ID with which we will sign in to the Office 365 portal site later.

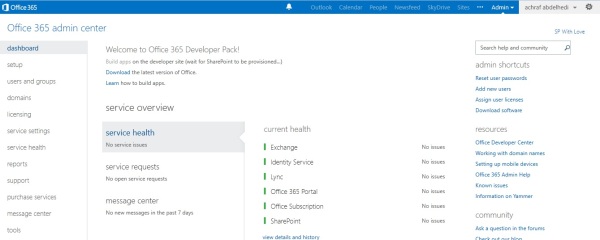
You will be then redirected to the Office 365 admin center. Just wait until the site gets provisioned.

4

Take your time to explore all the admin center areas.

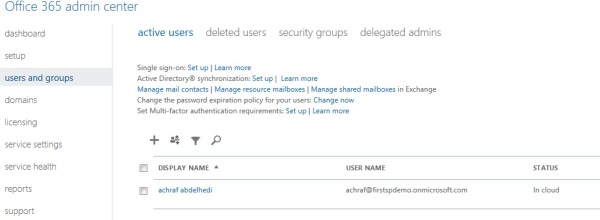
We got only one user license, we will find the admin account under « active users » when we click « Users and Groups » menu.

5

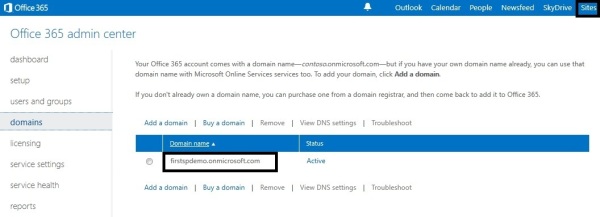
Check the « Domains » link, here’s the domain name of our developer site.

6

Click the « Sites » link to access your provisioned sites

7

Here we have two provisioned sites. The first one is a simple team site, and the second one is a public site (we can choose to make it online/offline with only one click. Once it is made online, anyone on the internet will be able to access it without having to be logged on).

Click the “Team Site” link to access the first site. I called it “SP With Love” I think because I still love SharePoint. (Trust me it’s not only about having a job, a career …having a blog or whatever you want but you should love what you are doing, that’s the secret ;))

Anyway, the next screen shows the home page of our team site. (Notice the usual menus already used in SharePoint 2010)

The next step is to deploy and install the “Napa” Office 365 Development Tools as I said at the beginning, so click the “Build an app” link to access the SharePoint Store.

8

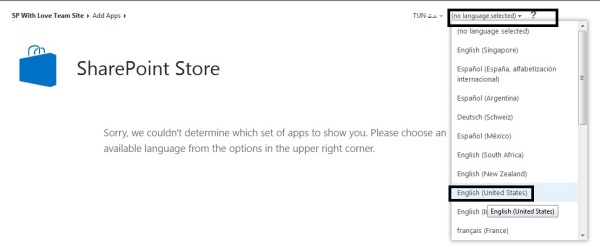
As the message is telling us, it couldn’t determine which set of apps to show in the page because there’s no selected language by default. We can select the English option and we will be redirected to the famous “Napa” Office 365 Development Tools app page as shown in the next screens.

9

10

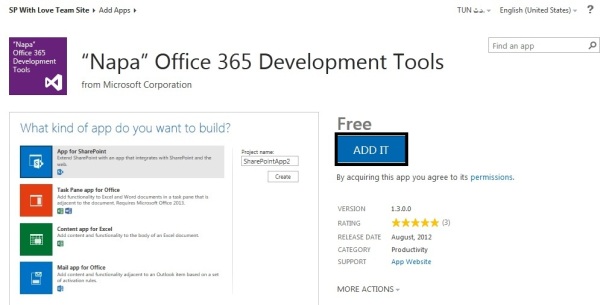
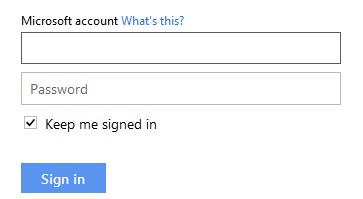
Here we are ! So click the “ADD IT” button to deploy and install this app to your developer site. You will need to sign in with a Microsoft account, not the one that we have created at the beginning to access the portal site.

11

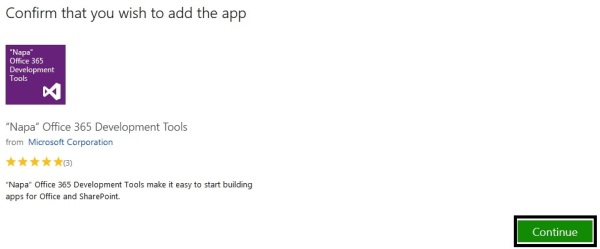
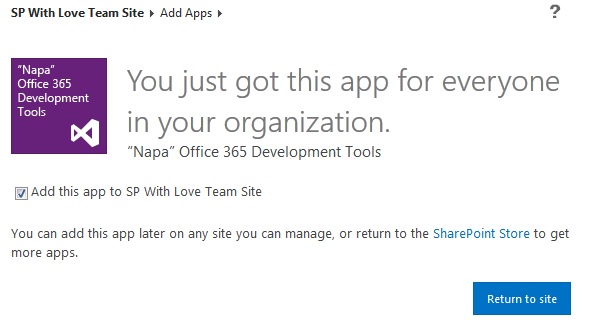
Once done, you will have to confirm your choice.

12

13

The app is now deployed to the site.

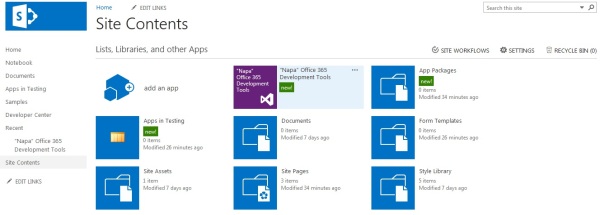
We will try to create and build our first app using this tool so go to the “Site Contents” page. Here we will find the lists, libraries and apps that exist in the site. We will launch this app so click the “Napa” Office 365 Development tools link.

15

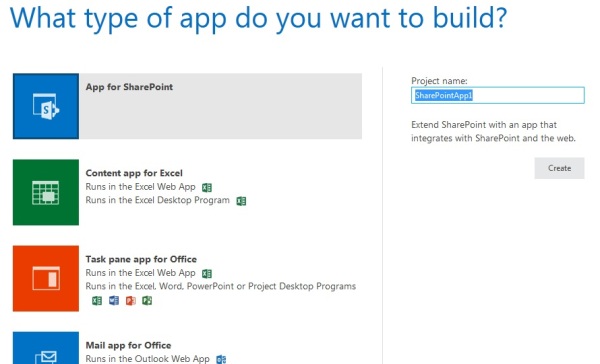
As shown below, using this tool we can create and build apps for SharePoint and for Office (Content app for Excel template, Content app for Excel and Mail app for Office). We will choose the first project template and click the “Create” button.

16

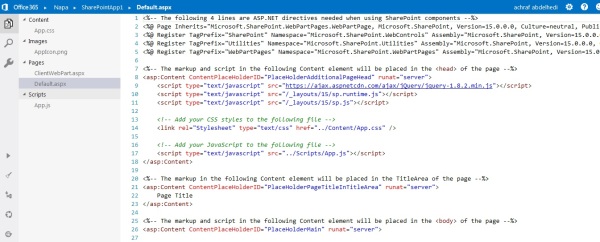
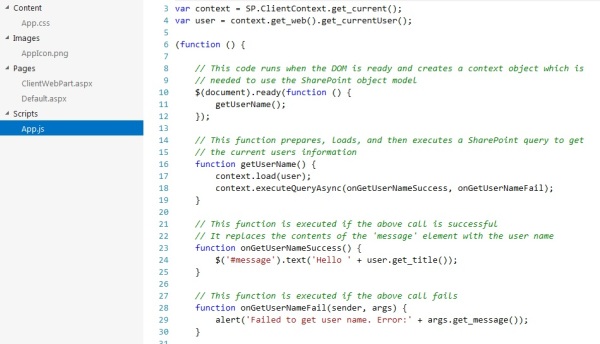
The tool generates the default files and content associated with the “app for SharePoint” project template. Check the structure of the project, the content of each element and the available buttons that appear in the left menu.

17

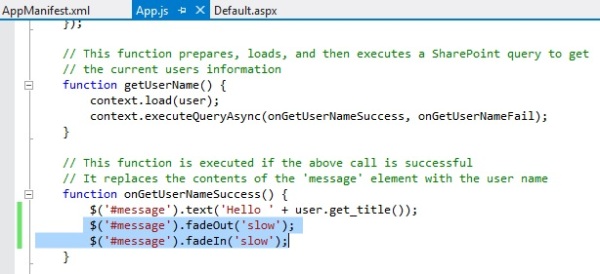
As shown in the “App.js” file, the app is trying to get the logged on user and to display its name (or title) in the page, and exactly in the “<p>” tag with id = “message”.

18

We still are talking about first steps with SharePoint 2013 and our developer site so to keep things simple we will just deploy it and see what it gives.

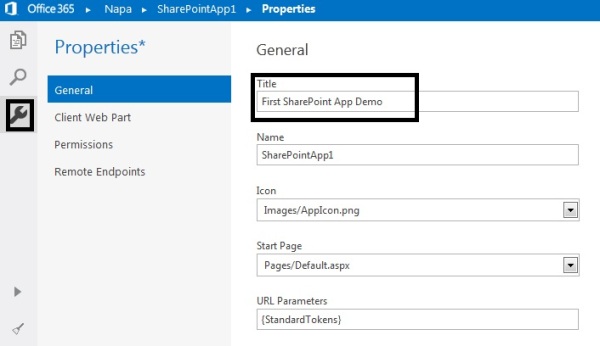
I will just rename the app and call it “First SharePoint App Demo”.

19

Once the title is modified click the “Run project” button to package and deploy the app.

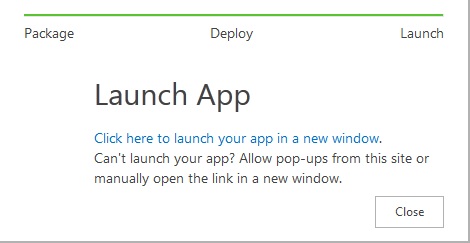
Now click the link to launch it.

20

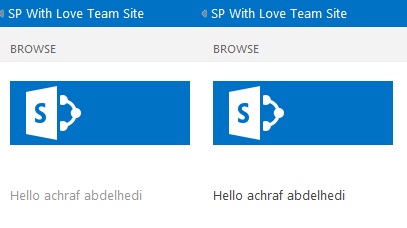
And this is our first app for SharePoint. The page, once loaded, is displaying the Hello message.

21

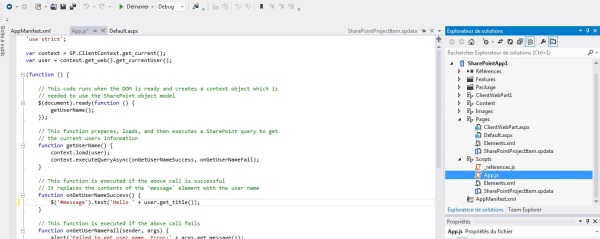
Let’s see something else. Check the other buttons available in the right menu of the development tool. We will open our project in visual studio, assuming that we need to add something and we want to do that with VS, not with the Napa tool, so click the button “Open in Visual Studio”. The project will be packaged and exported into a .exe file. Once downloaded, we will launch it. It will automatically check whether VS is installed or not, if it’s the 2012 version and whether the Office developer tools are installed or not. If all is installed it will load and open the project as shown below.

(You will be prompted to sign in to the developer site so VS can deploy the solution later, once modified)

22

23

Our first SharePoint app is simply displaying the logged on user name. Let’s add some animation using the JQuery Library and make the result look better. We will edit our solution so click the “App.js” file to open it and add the required code to animate the <div> tag showing the Hello message as shown in the next screen.

24

Once done right click the SharePoint project and select “Deploy” to deploy it.

Check the “First SharePoint App Demo” app on the developer site. Now we are getting some nice animation after the message is displayed the first time.

25

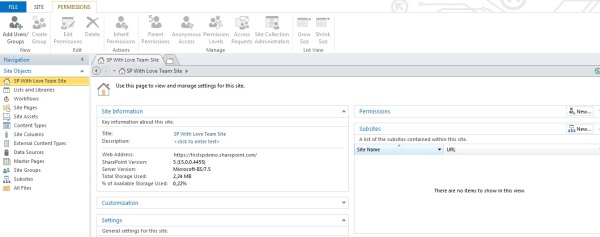
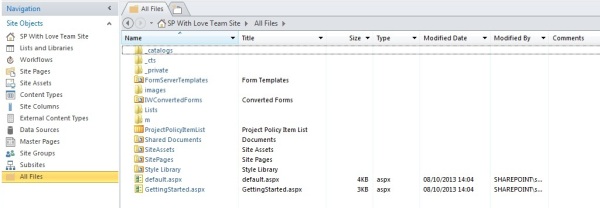
Until now we have seen how to provision our Office 365 Developer site, how to install the “Napa” developer tools, how to create our first app for SharePoint using this tool and how to edit and deploy it using Visual Studio. That’s what I call “first steps with SharePoint 2013 and Office 365” but there is more. What about SharePoint Designer ? lol so I can’t show you how to open the developer site with it I think that we can all do that. I just wanted to talk about SP Designer so you can explore the site and its content using this tool and check all the new functionalities that are available now within the new version.

27_spdesigner

28_spdesigner

That’s it ! I hope that was helpful !

We have seen until now how to get a development and testing environment, what are the development tools available now with Office 365 and SharePoint 2013, we have created our first SharePoint app and we can see things clearly with SharePoint Designer and all its fonctionalities. Now we have all what we need to start and to get more familiarized with SharePoint 2013 the online version and Office 365.

Feature Upgrade and Versioning

Hello,

SharePoint Foundation introduces the “Feature Upgrade” capability allowing to developers to upgrade their already installed features and to add new items or modules to already deployed solutions. This way we can extend SharePoint applications with more functionalities that were missing in the first version or simply change something to get a new version that meets our needs.

I tried to figure an example that can make sense to the “Feature Upgrade and Versioning” as a topic that I will be talking about in this post and through which we can explore and use, at the same time, all the technics that SharePoint offers to upgrade already deployed solutions and applications, generally speaking.

So, first of all (1) we will build and deploy our demo list with a content type, the list is called “Projects”, it includes just few simple fields to manage and save details about projects, then, assuming that we still need another field whatever was the reason (2) we will try to add this missing or required field to the list. Assuming then that the default list forms, generated by SharePoint, don’t meet any more our needs so, (3) we will develop and use new custom forms. That’s it! We start with a simple list, just few fields and just the default generated forms and we will go through the upgrade scenarios, to get a new version of our list, with all what we need.

I think that should be sufficient as an example to explain ”how” can we use the feature upgrade or even “why” do we need to use it in our real world projects. I still think that we all got this question in mind the first time we heard about feature upgrade and versioning.

The plan will be the following :

1)  Preparing our demo Sample

2)  First upgrade scenario : ApplyElementManifests and AddContentTypeField to add the new required field

3)  Second Upgrade Scenario : CustomUpgradeAction to define the new custom forms as the default forms used in this list

4)  MapFile – What about it ?!

5) Feature Upgrade Object Model

That’s it ! Now you can launch visual studio and try to achieve the following steps, as explained below.

1)  Preparing our Demo Sample

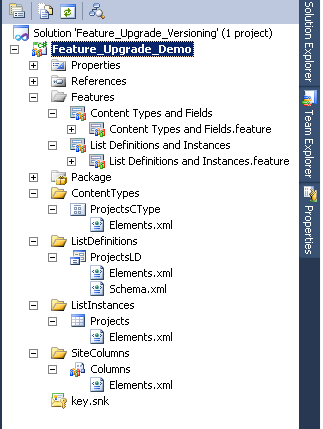
Our solution is the following:
1

I started with an empty SharePoint Project that will be deployed as farm solution. Just to keep things organized I’m using folders. So we need first of all to define the list columns, then to create the “ProjectsCType” content type in which we need to reference these columns. Once we got the content type we need to create the “ProjectsLD” list definition from content type, based on the “ProjectsCType” content type as you can guess. Finally add a list instance, called “Projects” in our demo, that gets its definition from the “ProjectsLD” list definition. It’s simple until now.

The defined columns are shown below :

2

Refer to my post if you still need to learn how to build a list definition with a content type using visual studio.

I renamed the “Title” field. Now it’s called “Name” in our Demo. (Refer to this post if you don’t know how to do that, otherwise this step is optional you can keep the default column display name).

I’m using two features to deploy the project elements. One site collection scoped feature called “Content Types and Fields” that contains the site columns and the content type.

The second feature is web scoped, it’s called “List Definitions and Instances” and it contains the list definition and the list instance as shown below.

3

Once done, build and deploy the solution. Check the site that you used for debugging and you will find our “Projects” demo list.

4

Until now we have prepared our demo list, we are ready to go through the upgrade scenarios.

2)      First upgrade scenario : ApplyElementManifests and AddContentTypeField to add the new required field

As we can see, the current “Projects” list contains 5 columns (the Project Name, the Code, the Client, Start Date and End Date). We still need another column to save a brief description of the project. We will upgrade our list to add the “Description” new field.

Allow me to explain how to proceed or, what I mean, where to add items exactly in the solution.

We need to add a new column to the “Projects” List. Our list definition uses the “Projects” content type. In such situations we need to use “AddContentTypeField” to add the new column to the content type referenced in the list definition. So there will be two required steps :

Define the new site column called “Description”.

Add this column to the “Projects” content type so it will be automatically added to the “Projects” list fields once the solution is updated and the feature is upgraded.

Let’s do it!

Add a new empty element to the “SiteColumns” folder. I called it “Fields_Version_1.0.0”. Double click this item and define the “Description” new field as I did below. (Don’t care about the layouts mapped folder we don’t need it until now)

5

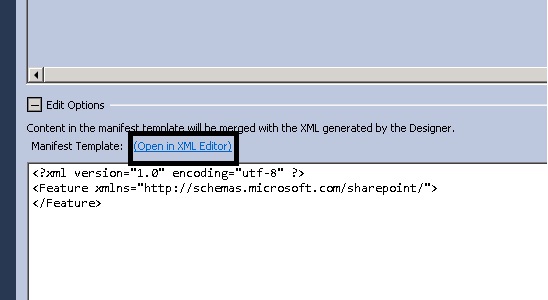
Double click the “Content Types and Fields” site collection scoped feature. Make sure that it contains the item called “Fields_Version_1.0.0”. Click the “Manifest” tab in the feature designer, then “Edit Options” and “Open in Xml Editor”.
61

Now we will configure our feature. There will be 2 required steps to do :

(a)    Increment the version number of the feature. By default the version assigned by default by Visual Studio is “0.0.0.0”, so we will increment it and use “1.0.0.0” for the new version.

(b)   Deploy the “Description” new site column using “ApplyElementManifests” and add it to the “Projects” content type using “AddContentTypeField”.

Use the xml editor to edit the feature and add the required “UpgradeAction” as shown in the following figure.

8

So we have incremented the version. Concerning the “UpgradeAction”, upgrade actions such as “ApplyElementManifests” and “AddContentTypeField” should be grouped in a “VersionRange” tag. We can define many “VersionRange” tags in the same “UpgradeAction”. The version of the already installed and activated feature instance that we need to upgrade is “0.0.0.0” so it should be included in the “VersionRange” (greater or equal than BeginVersion and lower than EndVersion).

ContentTypeId is the ID of the “Projects” content type, the “FieldId” is the ID of the “Description” field, we need to define the “PushDown” attribute to “TRUE” so the new field will be automatically pushed down to all lists content types as part of the upgrade.

ApplyElementManifests is used to deploy the new site column called “Description”. We can deploy any other element manifests the same way, as a part of the upgrade.

Now save your changes. Select the project item from the solution explorer and click “F4” or display its properties. Change the “Active Deployment Configuration” from “Default” to “No Activation”. Build and package the project to get the final new solution file.

The next step is to update the solution installed on the server to add the missing items and the required configuration that SharePoint needs to execute when we upgrade the feature.

We can do that manually or using the “update-spsolution” command.

First of all, get the solution file. Select the project item, click “Show all files”. Select the “bin” folder then right click the “debug” folder and select “Open Folder in Windows Explorer”. We need the “.wsp” solution file, called “Feature_Upgrade_Demo.wsp” in our Demo.
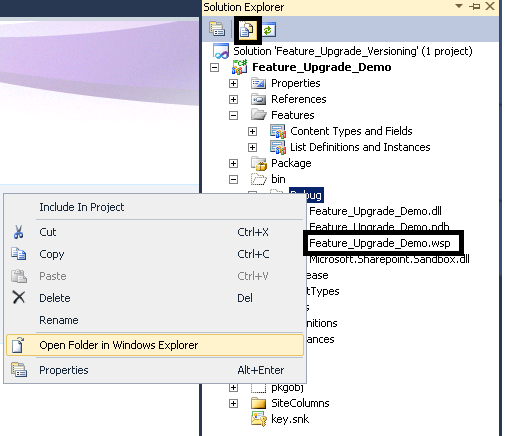
9

To update the solution file already installed on the server, launch SharePoint management Shell and use the following command :

Update-spsolution –identity YourSolutionFileName –literalpath PathOfTheSolutionFile –gacdeployment

Using the solution file in our demo, and assuming that it is saved under “C:\SolutionFiles\” the command should be the following : (make sure that the path doesn’t contain spaces)

Update-spsolution –identity Feature_Upgrade_Demo.wsp –LiteralPath C:\SolutionFiles\ Feature_Upgrade_Demo.wsp –gacdeployment

This command will add the missing files on the server and update the “Content Types and Fields” feature manifest file content as shown in the following figure.
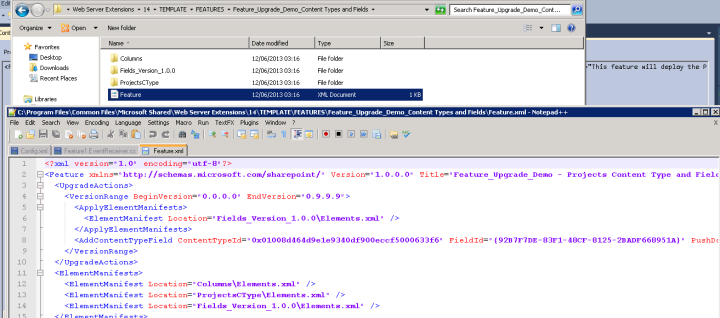
10

(If you prefer to do it manually, you just have to add the “Fields_Version_1.0.0” item and update the feature manifest file under “14\TEMPLATE\FEATURES\YourFeatureFolder”. Until now we don’t use code in the upgrade process so you don’t need to deploy the generated .dll to the GAC, any way don’t forget to make an iisreset if you did it manually, that’s required for the next step, otherwise SharePoint won’t know that there’s a new version of this feature and that it needs to be upgraded)

Once the solution is updated, we need to upgrade the site collection scoped feature called “Content Types and Fields” in our project.

We will talk about “Feature Upgrade Object Model” later, this time we will download, install and use “SharePoint 2010 Feature Upgrade Kit” which is “A set of tools for managing upgradable Features in SharePoint 2010” as described in the home page, it was developed by “CHRIS O’BRIEN”. (One of my favorite SharePoint Heroes) – http://spfeatureupgrade.codeplex.com/

Once installed, click “Site Actions”, “Site Settings” and then “Manage Feature Upgrades” link under “Site Collection Administration”. (Make sure that you have activated the required features if you don’t have the link)

11

As shown if the figure above, select the site scope, then the first option to get only features which need upgrade and click the “Search” Button. If you did correctly all the previous steps the tool will tell that the feature in which we have added the “Description” field needs to be upgraded.

Click the “Upgrade Features” button.

Now check your “Projects” list, and here we are.
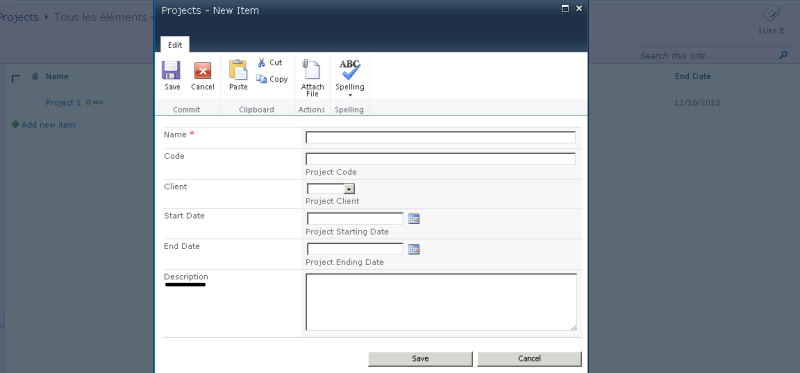
12As we can see the “Description” field is now added to the list and it appears in the “Projects” list’s new form.

You can use the tool that we have just installed to check the current version of the feature, this time select the second option “All Features” and click “Search” button again, we can see that is was upgraded. The version number is now “1.0.0.0”.

13_1

3)      Second Upgrade Scenario : CustomUpgradeAction to define new custom forms as the default forms used in the “Projects” list

Assuming now that we need more customized forms for our “Projects” list with for example, more validation rules or if you want to apply another look and feel ….whatever was the reason, we need to develop and assign new custom forms for the “Projects” list. That’s what we will do in our second upgrade scenario.

As shown in the following figure, we have added 3 application pages to be deployed to the “Layouts” mapped folder. These are the custom forms to be used in the “Projects” list. (There’s no style sheet or java script files in the project because I will just show you how to change the “Projects” list default forms as a part of the upgrade process I’m not interested about how these forms will look – sorry I have no time for that)
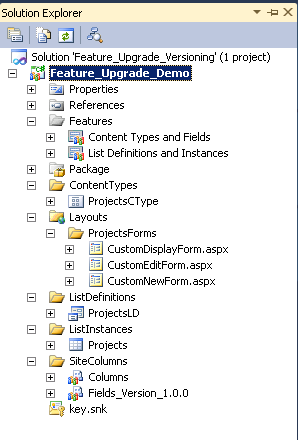
14

Now we need to add the upgrade required configuration and code to be executed when we choose to upgrade the feature. This time we are interested about the web scoped feature that deploys the list definition and the list instance, it’s called “List Definitions and Instances” in our Demo.

So double click this feature and edit its manifest file to add the following Upgrade Action with the required parameters to be used in the code.
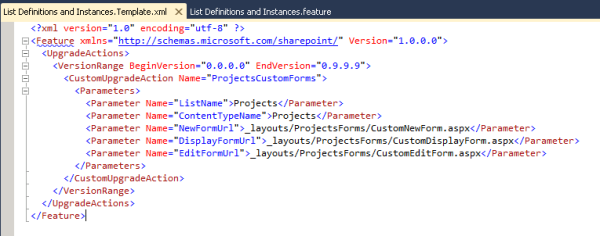
15The version of the already activated feature instance is “0.0.0.0” as we said and since it was not upgraded in the first scenario so we can use “1.0.0.0” for this new version.

The “CustomUpgradeAction” is used with code to be executed when we upgrade the feature. We can add many custom upgrade actions that’s why we need to use the name attribute to identify the upgrade action.

We need to know, as you will see later, the name of the list and the content type for which we will assign the new custom forms and the Url of these 3 custom forms.

Save your changes. Right click the feature that we are talking about in the “Solution Explorer” and add an event receiver. (A feature event receiver)

We are interested about the “FeatureUpgrading” event this time. Here we add the code to be executed when we upgrade the feature.

So uncomment this function and add the following code:

public override void FeatureUpgrading(SPFeatureReceiverProperties properties, string upgradeActionName, System.Collections.Generic.IDictionary<string, string> parameters)

        {

SPWeb web = properties.Feature.Parent as SPWeb;

SPList list = null;

string newFormUrl, editFormUrl, displayFormUrl, listName, ctypeName;

switch (upgradeActionName)

{

case “ProjectsCustomForms”:

listName = (parameters[“ListName”] != null) ? parameters[“ListName”] : string.Empty;

ctypeName = (parameters[“ContentTypeName”] != null) ? parameters[“ContentTypeName”] : string.Empty;

newFormUrl = (parameters[“NewFormUrl”] != null) ? parameters[“NewFormUrl”] : string.Empty;

editFormUrl = (parameters[“EditFormUrl”] != null) ? parameters[“EditFormUrl”] : string.Empty;

displayFormUrl = (parameters[“DisplayFormUrl”] != null) ? parameters[“DisplayFormUrl”] : string.Empty;

if (!string.IsNullOrEmpty(listName) && !string.IsNullOrEmpty(ctypeName))

{

list = web.Lists[listName];

web.AllowUnsafeUpdates = true;

if (!string.IsNullOrEmpty(newFormUrl)) {

list.ContentTypes[ctypeName].NewFormUrl = newFormUrl;

}

if (!string.IsNullOrEmpty(editFormUrl)) {

list.ContentTypes[ctypeName].EditFormUrl = editFormUrl;

}

if (!string.IsNullOrEmpty(displayFormUrl)){

list.ContentTypes[ctypeName].DisplayFormUrl = displayFormUrl;

}

list.ContentTypes[ctypeName].Update();

web.AllowUnsafeUpdates = false;

}

break;

}

}

We check the upgrade action name, if it is the correct one or the one that we need here we access the defined parameters to get the name of the list, the name of the content type and the url for the 3 custom forms. Once we got all that what we need we access the list and we define these 3 custom forms as the default forms to be used in this list with the “Projects” content type.

I think that you can guess what we will do now. You do ?

So build and package the solution. Get your new solution file as we did in the first scenario.

Update the already installed one with the same powershell command (the update-spsolution command).

We will use the same application page to upgrade the feature, as we did in the first scenario. Our feature is web scoped so select the “Web” scope from drop down list, then select the first option to get only the features that need to be upgraded and click the “Search” button.

16_1

Here we get our web scoped feature that needs to be upgraded. Click the “Upgrade Features” button to upgrade it. Once done it will tell you that the feature was upgraded successfully. (If you did it correctly)

Check your “Projects” list. The new custom forms should be displayed. (Here is my display form, I’m showing only the “Name” field – for demonstration purposes – I have not finished it)

17

That’s it! Now we have the new version of our “Projects” list. We started with the first version, and then we have upgraded it to get the new one with the new “Description” field and the new custom forms.

4)      MapFile – What about it ?!

It is used like this :

<MapFile FromPath = string ToPath = string />

We can use it to rename a file during a feature upgrade :

<MapFile FromPath =”OldFileName” ToPath =”NewFileName” />

Or to change the location of a provisioned file :

<MapFile FromPath =”OldLocation” ToPath =”NewLocation” />

The problem is that it’s not working or I can’t get it to work ! I have tried too many times but I get always the same result, the upgrade action is executed successfully but nothing has changed.

I just don’t want to think that there’s something missing in my post so I will come and update this part if I get it to work. (The naughty MapFile !!)

5)      Feature Upgrade Object Model

The SharePoint feature upgrade capability is based on the following members and types that have been added to the SharePoint Object Model to allow developers to upgrade their features:

  • FeatureUpgrading event : as we have seen, this feature event receiver is raised when the feature is getting upgraded and when custom code is required for the upgrade action (when declarative technics are not sufficient to execute all the required upgrade steps).                                                                                                                                                                                                                                                 Anyway, using this event, we can access the current executing context and its properties (depending on the scope of the feature), the custom upgrade action name and the required parameters to be used in the upgrade action.
  • The “Version” attribute : “0.0.0.0” by default and if it’s not defined if the “Feature.xml” file.

The feature, whatever was its scope (Farm, Web Application, Site Collection or Web) needs to be upgraded if the current version of the activated instance is lower than the version attribute value defined in the new “Feature.xml” file. If the upgrade action is executed successfully SharePoint increments the version of the upgraded feature so it matches the version defined in the new “Feature.xml” file.

  • QueryFeatures method :

This is the missing part of the feature upgrade object model that we have not talked about until now, so it’s time to understand what it means and how to use it.

We have installed and used the “SharePoint 2010 Feature upgrade Kit” in our demo. We used it to get features that need to be upgraded, we define the scope then we click the “Search” button and it’s done, finally we just have to click the “Upgrade Features” button to upgrade the selected features.

The tool simply uses the “QueryFeatures” method with the selected scope to get a list of the features that need to be upgraded.  This method returns an “SPFeatureQueryResultCollection”. When we click the “Upgrade Features” button the tool calls the “Feature.Upgrade()” method for each of the selected features to upgrade them.

This method can be called from within an SPSite object, an SPWebApplication, an SPWebService or an SPContentDatabase.

The following code simply gets the web scoped features that need to be upgraded in the current site and adds them to a drop down list.

18

Check this method overloads here. There’s more about the feature upgrade object model too.

  • The Upgrade method

We call it to upgrade the feature, it takes one parameter of type Boolean to indicate whether to force the feature upgrade or not. Just one more detail about this method, never call it from within a feature upgrade event receiver.

That’s all about feature upgrade and versioning. I hope that was helpful!

Provisioning Web Part pages and WebParts

Introduction

Hello,

Just allow me to begin with few lines of introduction this time to explain why I prefer talking about provisioning web parts and not about any other specific topic, although I’m still trying to share what I’m learning and I think that there’s still too much technics to talk about.

After 2 years of developing SharePoint applications, I think that the way how development teams do things depends on their experience and certainly what they know, what they don’t, the way how they are organized sometimes…. There are certainly too many other conditions that we should not forget about ….. But to explain what I’m trying to say, it depends also on the way how they are TRYING to do things.

Talking about SharePoint Development, beginners start with few tutorials or samples and try then to practice these walkthroughs exactly as they were explained, step by step, in order to get their first demo working. Developers with much more experience, or professionals try to make things look better and to find more advanced technics to automate even the process or all the required steps to get the same result or even to make it look better, as I said.

We start all by developing web parts, once they are deployed to the site we should edit the already existing page or create a new one and insert the web part in the right web part zone, where it should be displayed. That’s perfect, it’s working! But what if we can automate things, this way you just have to deploy the solution or the web part, and that’s all, check your page and here’s your web part, already displayed. That should be awesome too. You don’t think so?

It’s just one simple example I know, we are talking about how to provision web parts and there are too many other topics to talk about too but I think that you should go this way.

Talking about deployment on the production servers now, because this final step depends also on the way how your application was designed and developed. I’m still trying to explain how to “automate deployment process”, so whatever was the method with which you used to do that, this way you don’t need to do any manual configurations or to manually define some settings or even to add some required assemblies or whatever was what you should do, you just need to launch the PowerShell script (only one .bat file) and wait until your solution(s) gets installed and your application gets provisioned, configured and “ready to use”.

With all my respect for the other deployment methods or approaches (using content database for example, this way we create a new web application to which we attach the restored database once it’s back upped from the development environment’s SQL Server …you should install the .wsp solutions too) I don’t want to talk about site definitions or web templates or any other site provisioning methods it’s not about that I’m just trying to explain how things should be done, I mean, and just for example, never edit manually the web.config file to add some configuration settings, that should be done using the “SPWebConfigModification” class so your modifications gets persisted too, never deploy assemblies manually you can do that using the package designer, don’t add manually files where ever you want to make them, use instead Modules for example or Mapped folders or the deployment type property, just keep all that in mind and try to organize your features and your solution(s)…your feature dependencies your feature event receivers if you need to execute something once the feature gets installed, activated….that’s it ! Use SharePoint development tools and features and all what SharePoint offers to you, to develop your SharePoint applications. This way you can even plan your upgrade scenario(s) or make this step easier anyway even If you don’t need to do it right now, but things become more organized and easy to maintain.

I have just talked about all that (and I’m still talking, I know I’m talking too much) because the way how you will do things tomorrow, depends on the way how you are doing them today or even how you did them yesterday, so think about your SharePoint application this way, otherwise you will finish with too much problems.

Provisioning Web Parts Declaratively:

Starting with the declarative approach.

Our solution is the following:

1

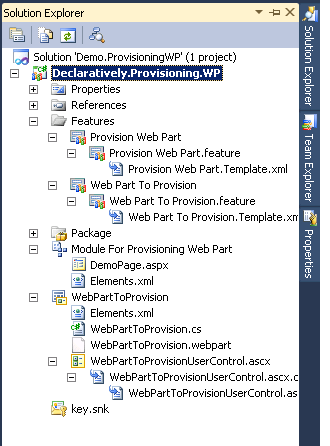
  • WebPartToProvision : a simple visual web part, just to show one message telling us that it is provisioned declaratively into the page. This web part will be deployed through the site collection scoped feature called “Web Part To Provision”
  • Module For Provisioning Web Part : a module that contains the web part page to be deployed to the site pages library with the required configuration to show the visual web part. This module is included in the web scoped feature called “Provision Web Part”

That’s all what we need in our demo, until now.

We suppose that we just need to deploy our “DemoPage.aspx” to the “Site Pages” library, and to call it “VWDemoPage.aspx”, the module content should be the following :

2

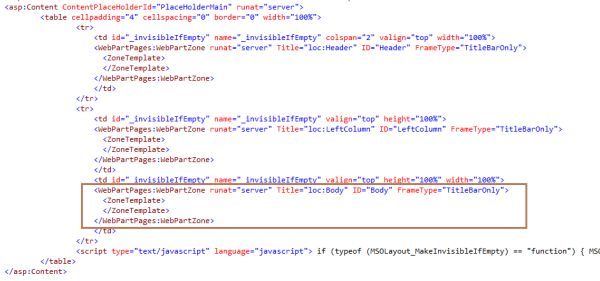
Trying now to provision our visual web part. Notice that our page contains 3 web part zones as shown below. We want the visual web part to get displayed in the third web part zone with ID = “Body”.

5

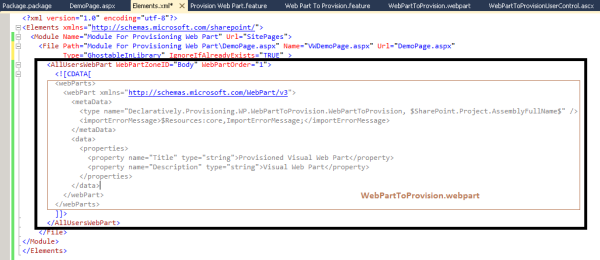
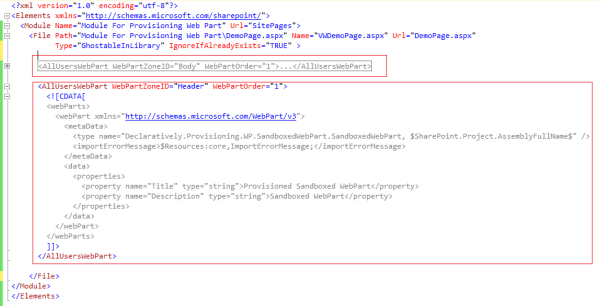
To do so and to provision the visual web part declaratively through the Module, we need to add the required configuration as shown below :

3

  • AllUsersWebPart tag : contains simply the web part to provision through the module
  • WebPartZoneID : contains the ID of the third web part zone In our demo page, in which we want the visual web part to get displayed, as you can guess J
  • WebPartOrder : to specify the vertical positioning of the web part within the zone
  • WebParts tag is the xml defined in the “WebPartToProvision.webpart” file already created within the web part

Pretty straightforward …no ? I think it is.

So deploy the solution, check your “Site Pages” library, find and open the “VWDemoPage.aspx”.

I don’t think that you will get the same message with the same applied style 🙂 since you don’t have my demo solution but you will get certainly your web part provisioned and displayed in the web part page.

That’s it ! really simple !

4

May be you are wondering, if I can guess, now what about provisioning sandboxed web parts ?

Exactly the same thing!  That’s it!

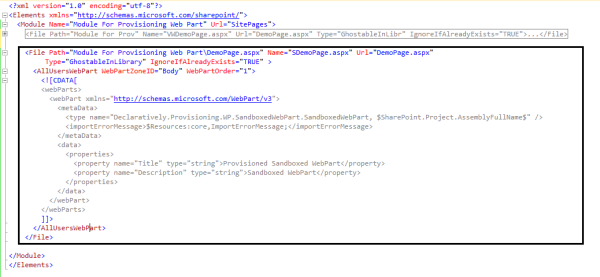
Assuming that you have created your sandboxed web part, you want to provision it as I did, in a new page and using the same module and the same DemoPage.aspx page, your module elements.xml file should be something like this:

6

Trying now to provision it in the first created page in which we displayed the visual web part, but for this sandboxed web part, we choose to display it in the “Header” web part zone. This time your module xml should be the following:

8

If you did it correctly you will get your web parts displayed in the same page, the first one (the sandboxed web part that shows the site lists in a drop down list in my sample) in the “Header” web part zone, and the visual web part will be displayed in the “Body” web part zone.

9

That’s all! Hope that was helpful!
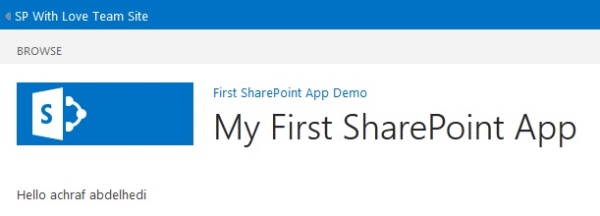
How to enable and use SharePoint Developper Dashboard

Did you have troubles or issues with your SharePoint pages because they take too much time to load and you wanted to check where the problem is? Or did you wonder what’s going on behind the scenes or what SharePoint did during the page load? You don’t have to think too much about all that, you just need to know some details about the developer dashboard utility in order to get it working and enabled and then, once it’s done, you can monitor all your SharePoint pages.

It’s disabled by default (Off) so first of all we need to enable it on the web server. It means that you should have the required permissions to configure and update its settings.

We can choose to get it enabled all the time (On) or when needed only (OnDemand).

The question now is how to enable this utility and update its configuration settings.

We can do that using (1) the stsadm command line, or with (2) Powershell or, if you prefer to write some code to do it (3) programmatically, that’s possible also but this time you don’t even need to launch visual studio because I already did that for you, so you just need to install and use the web part in the solution file attached to this post from the central administration.

1)      Using the stsadm command line, the command is the following :

stsadm –o setproperty –pn developer-dashboard –pv [on|off|ondemand]

To get the current setting and check whether it’s enabled or not we can use this command:

stsadm –o getproperty –pn developer-dashboard

2)      Using PowerShell

We can use any PowerShell script editor to write the following script to enable the developer dashboard using the “OnDemand” mode:

1

The first line is to load the SharePoint PSSnapin, we need to do so in order to execute the SharePoint PowerShell commands. Once done, we access the developer dashboard settings and set its “DisplayLevel” property to “OnDemand”, otherwise we can make “On” if we want to get it enabled all the time or “Off” to disable it, if it is already enabled.

We will save the file using the “.ps1” extension so we can run it later from a batch file. (just to show you how can we do that, that should be helpful when you write PowerShell script to automate SharePoint solutions  deployment for example or when you need to achieve known configuration tasks, this way you just need to prepare your .bat files with the required PowerShell scripts and use them later any time you need to do so)

I will call them respectively “DevDSB.ps1” and “EnableDevDSB.bat”, keep them in the same folder and add the following content in the .bat file to execute, once clicked, the “DevDSB.ps1” file.

2

That’s it! Right click the “EnableDevDSB.bat” file and click “Run as Administrator”, wait for few seconds until SharePoint executes the command and you will get your developer dashboard enabled.

3)      Enable developer dashboard programmatically with code

To do it programmatically we need to use “Microsoft.SharePoint.Administration” namespace and to run the code from central administration. We just need 3 lines of code to get it enabled as shown below:

5

We access as we did with PowerShell the developer dashboard settings and we update its “DisplayLevel” property using the desired mode.

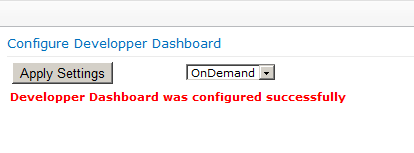
The attached solution, once installed on your server central administration, will allow you easily to configure the developer dashboard settings. You just need to select the desired mode to apply from the drop down list, click “Apply Settings” button and it’s done.

6

Check your central administration site collection scoped features and you should find the following feature, get sure that it’s activated. (It will be automatically activated once the solution is deployed to the central administration site, but check it if you don’t find the web part under custom group)

7

Select “OnDemand” option from the drop Down List an click “Apply Settings”.

Check your SharePoint site, you should notice an icon at the upper right side of the page used to enable\disable the developer dashboard as needed.

3

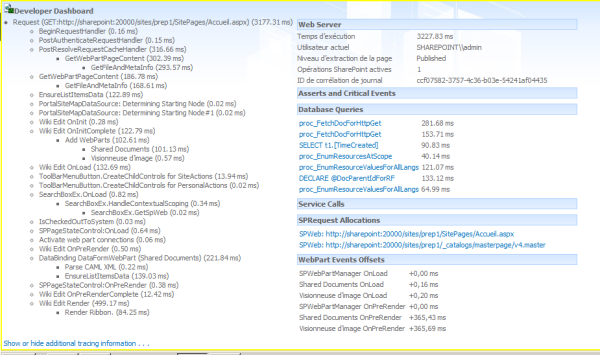
Click it and you will get the developer dashboard enabled as shown below.

4

We can see at the left part the url of the current page that was requested and then all the functions that were called and required to load and render the page content and for each one how much time it took. Here I was loading the home page for a team site, notice the shared documents web part and the image web part for example that were loaded and added to the page.

Check all the other data displayed on the figure like the database queries that were executed (click the link and you will get more details about the query), the current logged in user, the execution time, there’s also the event correlation token in the logs and the web parts events.

That’s it! Now you can understand easily what SharePoint did before your page gets displayed and when it’s loading.

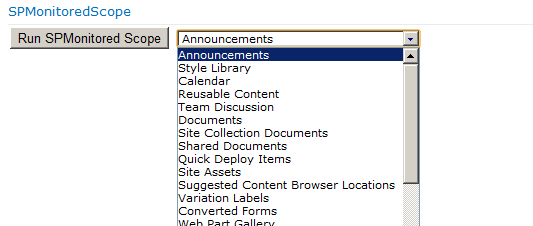
You can even monitor the performance of your page with code using the developer dashboard, from custom web parts for example or whatever you put in your page. We can do that using the “Microsoft.SharePoint.Utilities” namespace and the “SPMonitoredScope” class as in the following figure.

I’m using “Microsoft.SharePoint” and “Microsoft.SharePoint.Utilities” namespaces in the same class that’s why visual studio gets confused and it used the constructor in the “Microsoft.SharePoint” namespace, so I choosed to call the second namespace “Utility” and to use it this way.

using Microsoft.SharePoint;

using Utility = Microsoft.SharePoint.Utilities;

8

I’m enumerating the lists in the site and I display them in the drop down list as a simple example.

9

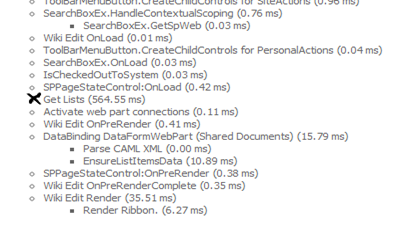
Check the developer dashboard displayed data again and you will see your monitored scope, called “Get Lists” in our sample, and how much time it takes to add the lists to the drop down list.

12

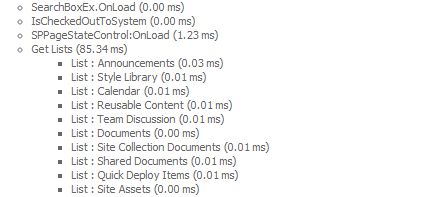
We can use nested monitored scopes too. (In our sample we can add another monitored scope before we add the list title to the drop down list to get an output as the following)

11

I’m using a simple example to demonstrate how to call the “SPMonitoredScope” class but that can be more useful in other situations when you really need to monitor every scope or every part of your code because you don’t know where the problem is and why your page takes too much time to load. Hope that will be helpful in such situations!